Table of Content
Drupal is a powerful and secure CMS, especially for large and complex websites. It’s great for scalability and handling advanced use cases. But in day-to-day reality, teams often find Drupal harder to manage. Simple content changes can feel slow, layout updates usually need developer support, and ongoing maintenance can quickly become expensive.
WordPress is popular for a reason. It’s faster to work with, easier for non-technical teams, and gives you a huge ecosystem of themes, plugins, and integrations out of the box. Most marketing and content teams can publish updates, optimize SEO, and launch new pages without waiting on developers for every small change.
Because of this, many businesses and agencies are planning to migrate from Drupal to WordPress in 2026 to:
Cut down development and maintenance costs
Make content updates easier for internal teams
Improve site speed and SEO performance
Scale faster with plugins and third-party tools
That said, migrating from Drupal to WordPress isn’t a simple export-and-import job. If it’s done carelessly, you can lose URLs, SEO rankings, media files, or even user data. A proper migration needs planning, clean data mapping, and a structured rollout to avoid downtime.
In this Drupal to WordPress migration guide (2026), you’ll learn:
The safest way to move your content
How to migrate users, media, and SEO URLs
Common mistakes we see teams make during migrations
A clear step-by-step process to move without breaking your site
Let’s start with the real reasons why moving from Drupal to WordPress makes sense in 2026.
Reasons to Migrate From Drupal to WordPress
Why should you migrate to WordPress from Drupal? The answer lies in the need for a robust yet easy-to-use platform offering extensive customization options. With WordPress, you get a platform where it becomes easy to manage your site and content. Besides, you will get advantages in different areas, such as:
- Lower development as well as maintenance costs
- A massive selection of SEO-optimized and customizable themes
- An intuitive dashboard with a user-friendly interface
- Access to more than 59,000 plugins to integrate useful functionalities into your site
- Active community support through documentation, third-party tools, and forums
- Useful built-in SEO features like customizable title tags, permalinks, etc.
Now, let us understand the common challenges you may face while migrating Drupal to WordPress.
Common Migration Challenges and Solutions
A clear understanding of the potential obstacles is crucial to overcoming them during the migration. Common challenges and solutions that you may need to consider are:
1. Challenge: Data corruption or loss while transforming data
Solution: Create a complete backup of files and the database. You can use Drupal’s built-in backup module or a third-party backup tool to create a fallback option.
2. Challenge: Drop In SEO Rankings
Solution: To avoid such issues, it is important to carefully map all the old Drupal links to the new URLs in WordPress. Don’t forget to use 301 redirects. Take the help of a migration plugin for this. After the launch, submit the new sitemap to Google Search Console.
3. Challenge: Lack of custom functionality from Drupal’s Modules
Solution: Make use of Drupal modules in WordPress. Audit the custom functionalities offered by the Drupal modules and find similar plugins for your WordPress site before beginning your migration process. You can hire a plugin developer to create custom plugins.
4. Challenge: Mismatch in Content Structure
Solution: Drupal utilizes blocks, nodes, views, taxonomy, etc, which may not be available in WordPress. Create custom structures utilizing clear taxonomy plans. You can also use WordPress’s ACF- Advanced Custom Fields or custom post types for accurate content structure.
By carefully using these strategies, it is possible to avoid disruption and ensure a quick and successful Drupal to WordPress migration. Now, let’s move on with a pre-migration checklist to ensure a smooth and fruitful shift.
Also read: How to Migrate Your Joomla Website to WordPress
Pre-Migration Checklists For a Successful Migration
1. Backup Your Drupal Website
Before you get started with the process, it is preferred to take a complete backup of your Drupal website. This way, you can have a safe copy of every setting, customization, and data. Use the Backup and Migrate module for this.
2. Audit The Content
Carefully review all custom blocks, nodes, media assets, views, and taxonomy. Understand what is outdated and necessary for your new WordPress website. Also, you should map out other Drupal data, such as SEO metadata, authoring information, attachments, and publishing dates etc.
3. Keep Your Drupal Database Info Handy
To export Drupal content, you will need Drupal database information. You can find it by visiting the Drupal website’s default directory and accessing the settings.php file.
4. Latest Version of WordPress
Install the latest WordPress version to ensure compatibility. With this version, you will get access to updated security patches and features. Most hosting service providers offer the latest version of WordPress, and you can install it with a few simple clicks.
5. Understand Your Hosting Situation
Remember that the performance and overall functionality of your new WordPress site will depend on the type of hosting you use. Choose one that specializes in WordPress. Based on your budget, you can opt for Share, Managed, or Dedicated hosting. For high-traffic websites, dedicated hosting will be an excellent option.
6. Consider Your Internal Links
The URL structure of Drupal will not match WordPress’s URL. So, if your Drupal site has multiple internal links, then make a list of crucial links and work on redirecting them after the migration. Avoid broken links.
7. Assembling Your Drupal to WordPress Migration Team
The Drupal to WordPress migration involves both technical and non-technical processes. You may create an in-house team for this, but partnering with an expert can bring more benefits, making the process hassle-free. For a simple blog site with no major custom functionality, an in-house team would be a better option. However, for a highly complex and large Drupal site, it is preferred to hire an experienced migration expert.
With all the above points marked, you are now ready to begin with the Drupal to WordPress Migration. Let’s start.
Drupal to WordPress Migration: Steps to Follow
Here we have outlined all the important steps for a successful migration, and this process utilises a dedicated migration plugin.
Step 1. Configure Your WordPress for the Migration
Start by setting up a new WordPress installation. Begin with a staging server, as it can simplify the testing procedure. Don’t install any unnecessary themes or plugins yet.
A clean WordPress environment ensures there will be no conflict while importing the content.
Step 2. Installing and Configuring The FG Drupal to WordPress Plugin
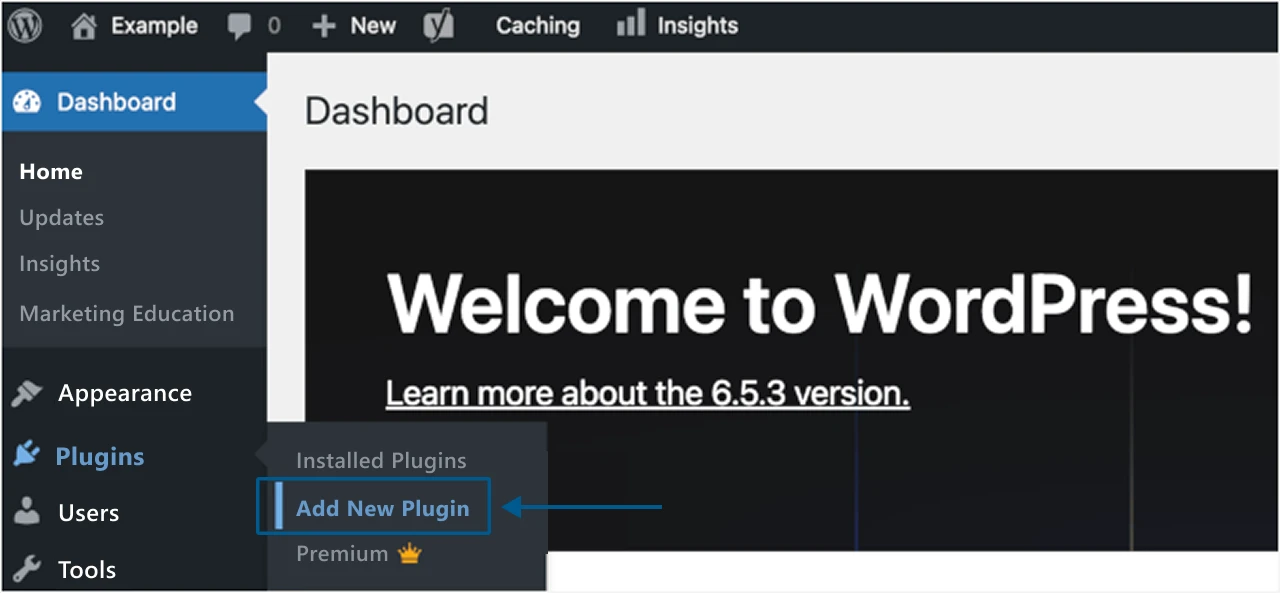
Log in to your WordPress site and click on the Plugins option located in the dashboard.
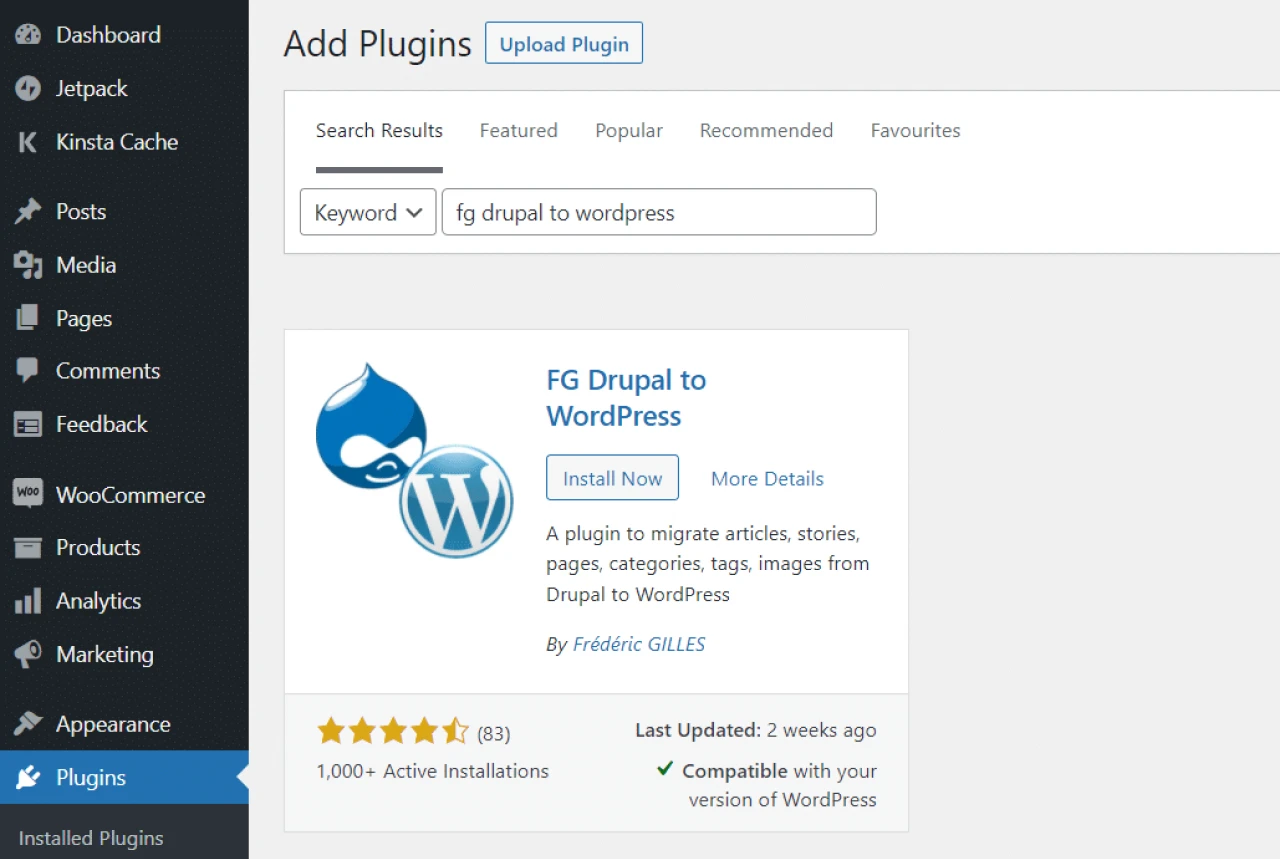
Click on the "Add New Plugin" option and search for the "FG Drupal to WordPress" plugin.
Now, click the "Install Now" button to install the plugin.
Step 3. Exporting Data From Drupal
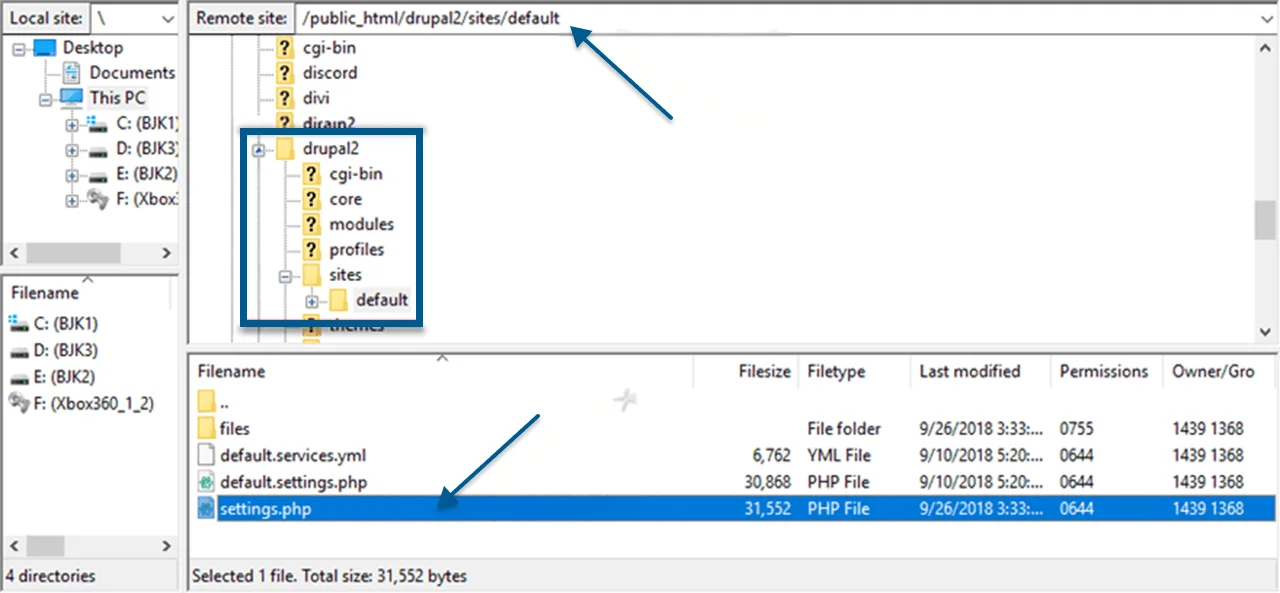
You need to extract all the required content and data from your Drupal site. If you want to customize your data extraction process, you can opt for the FTP option and choose the files you want to export.
Visit your Drupal installation folder and then click on the Sites option. Now, choose the Default option and click on the Settings.php option to open it.
You can now see your Drupal database details such as username, password, database name, etc. Write down the information for later.
Step 4. Importing Content to WordPress
Follow these steps carefully to import your Drupal content to WordPress. You will be using the FG Drupal to WordPress plugin for this.
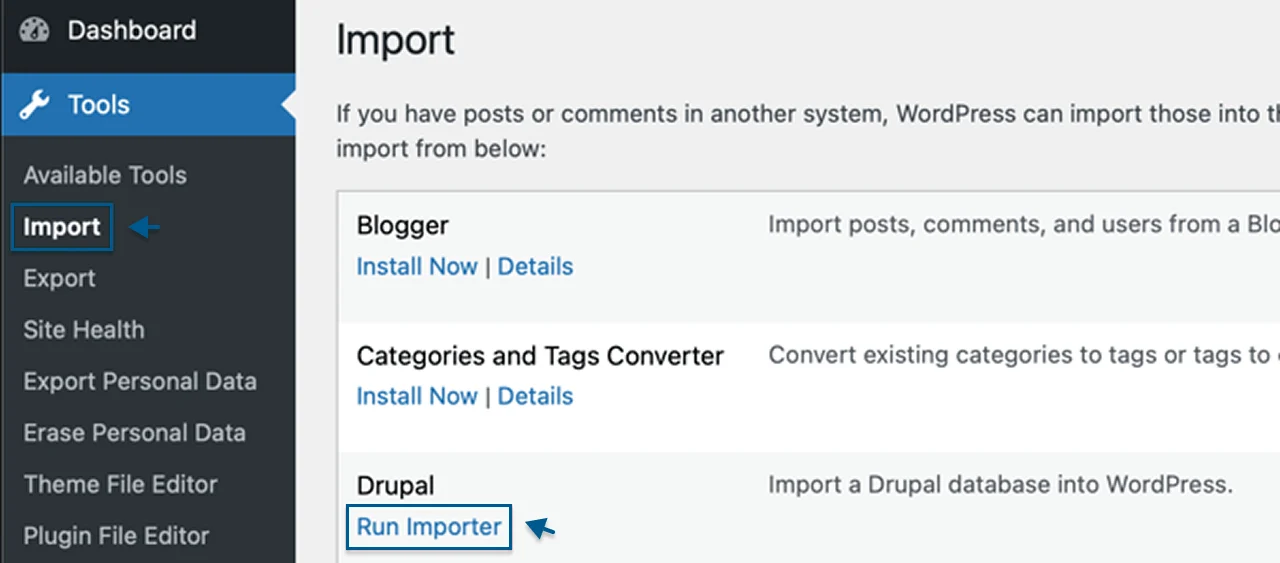
Visit Tool and then click on the Import option.
Now, click on the Run Importer option located under the Drupal list.
Enter the Drupal website URL.

Then enter the required Drupal parameters such as host name, port, database name, username, and password.
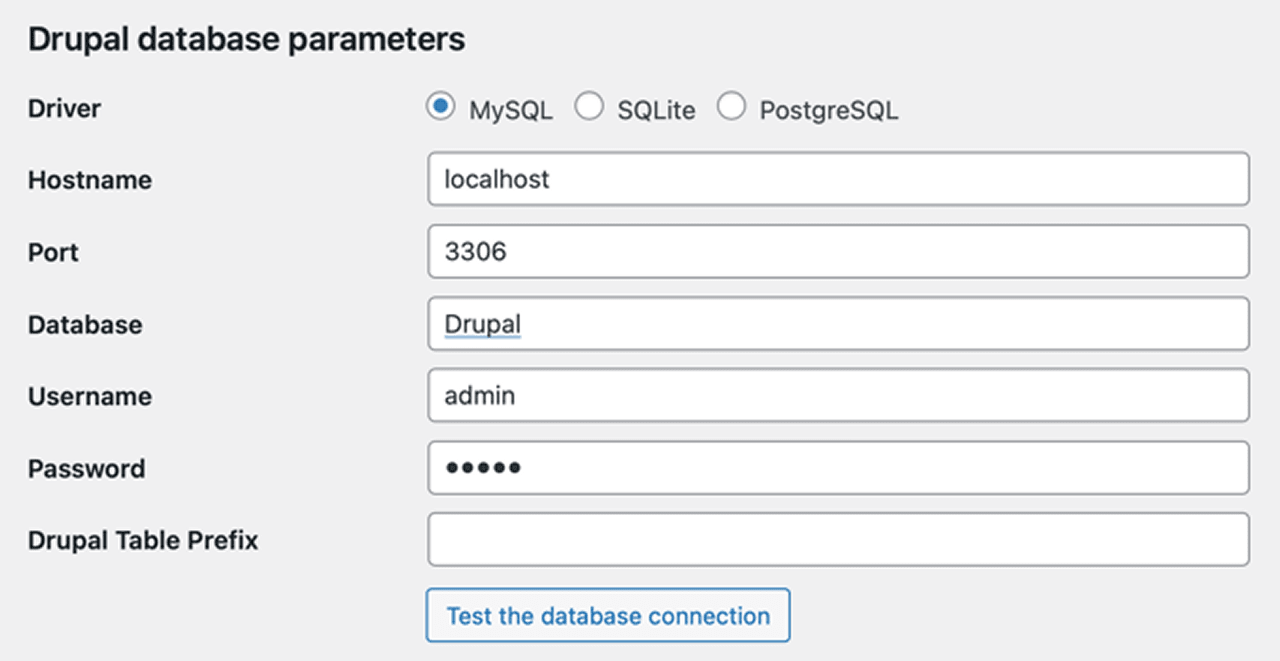
Once done, click on the Test the database connection button.
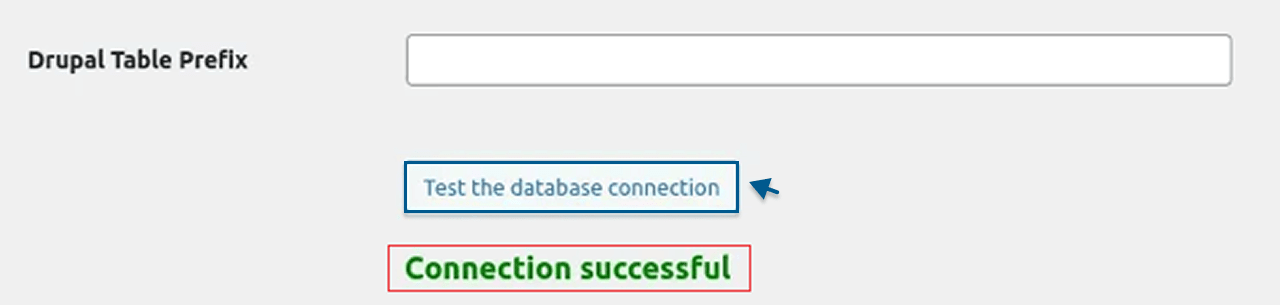
If you see a Connection Successful notification, proceed to the next step.
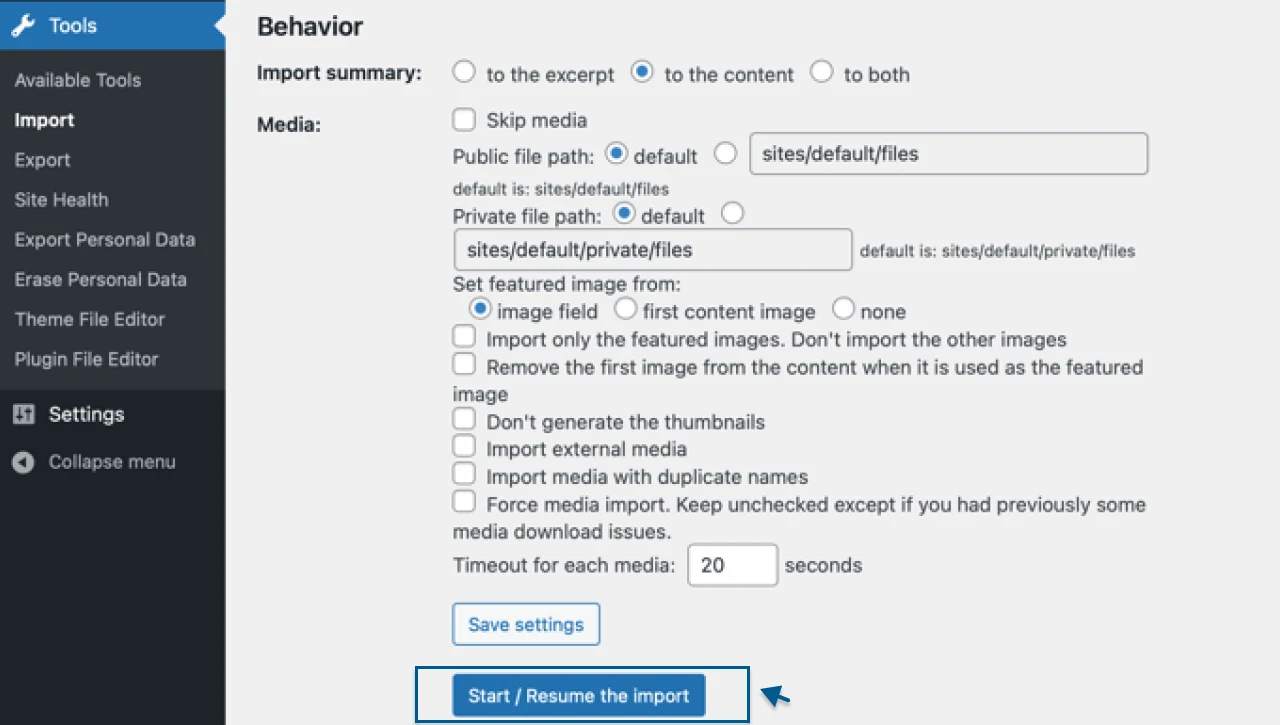
If you check below the connection settings, you will find some other options to control what you want to import. There is no need to change the default settings. Just click on the Start/Resume the Import” button to begin the process.
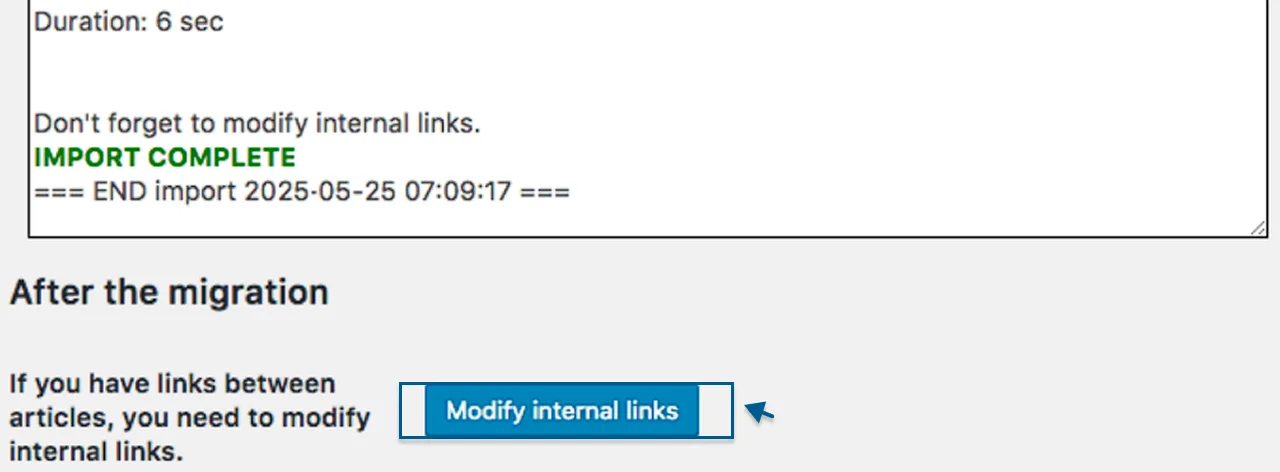
Once the process is completed, you will get a success message. That’s it, you have successfully imported your Drupal content to WordPress.
Step 5. Updating Internal Links
After migrating your content, you can see the old content in your WordPress. However, the internal links might still be pointing to the URLs used on Drupal. If visitors click on a link, they will face a broken page issue. To update all your internal links, follow these steps:
Visit the FG Drupal to WordPress plugin dashboard.
Click on the “Modify Internal Links” option.
Step 6. Final Touches, Testing, and Launching
Carefully check the new site for formatting errors and missing content. Make sure that all pages, posts, user accounts, and categories have transferred properly.
Carry out a proper test of your site for broken links.
Ensure that it runs smoothly on different browsers and devices.
Test the buttons, contract forms, and all interactive elements.
Now, you just need to update the DNC configuration to make your site live.
Now that the migration process is complete, let’s explore the essential steps to take post-migration to ensure a smooth functioning of your new WordPress Website.
Post-Migration Checklist
1️⃣ Point The Domain to WordPress

It is crucial to update the domain’s DNS to point to your WordPress IP address. You can do that by visiting the Domains section under the Upgrades option.
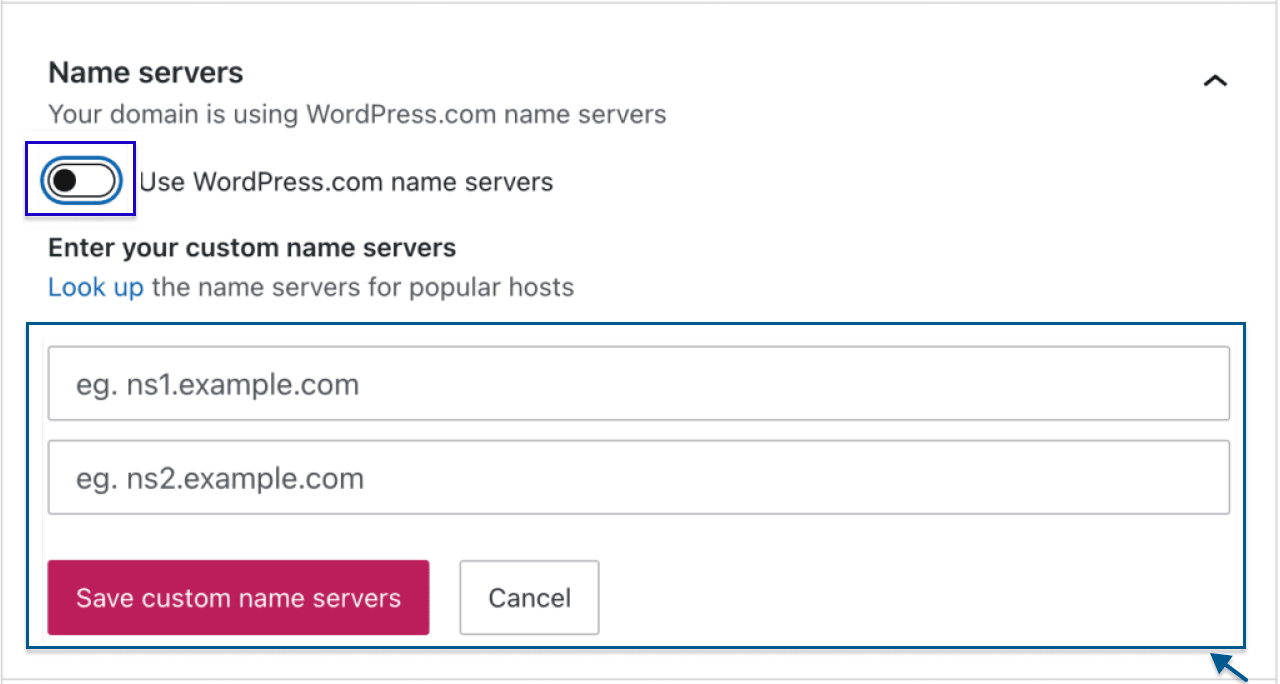
After that, disable the Use WordPress.com name servers” option and enter the required server values. Once done, click on the Save custom name servers button. That’s it. Your new site will be ready to go live within a few hours.
2️⃣ Work With Custom Drupal Modules
Check the Drupal modules you identified while auditing your existing content and modules. Now, install and test similar plugins in your WordPress site. For instance, if you were using a module for event management in Drupal, then in WordPress, you can use the Event Calendar plugin. In some cases, you may need to opt for custom plugin development.
3️⃣ Leverage Amazing WordPress Features
WordPress offers multiple options to customize your new site’s appearance. For example, you can easily create amazing content layouts using the Block Editor. The Theme Customizer allows you to modify the design of your site in real-time. More features can be added to your site by using plugins.
4️⃣ Select A Perfect Theme For Your New Site
With WordPress, you will get a huge selection of themes. Choose one based on your site’s functionality and design requirements. For better SEO ranking and more customizable features, it is advisable to use a premium theme. Some of the best options are Botiga, Divi, Astra, Sydney, Storefront, and Hesita.
If you are migrating from a custom design, you can use our PSD to WordPress service to match your original look and feel.
Now let’s dive into some site optimization techniques to keep your website trending and successful all the time.
Read this: Migrate from WordPress to Drupal
Optimising Your New WordPress Website: Consider These Factors
#1. SEO Performance
Configure your new website for better SEO performance by generating a new XML sitemap and submitting it to Google Search Console. Furthermore, use a robust SEO plugin for on-page optimizations. Don’t forget to update your Robots.txt file.
#2. Security Enhancement
To protect your new website, install robust security plugins such as Wordfence. Enable 2FA or Two-Factor Authentication, set strong passwords for every user, and update plugins and themes regularly. Also, get an SSL certificate for your website.
#3. Image Optimisation
If your website has large images, install plugins such as Imagify or Smush to compress and optimize them. It will increase the loading speed.
#4. Leveraging Caching
Through caching, you can reduce server load and speed up your website. For this, you can use plugins such as WP Rocket or W3 Total Cache.
#5. Use of CDN
By using a CDN- Content Delivery Network, such as Bunny CDN or Cloudflare, you can boost content delivery time by storing assets such as JS, CSS, or images on servers close to visitors.
#6. Install Required Plugins
Carefully analyze potential plugins and choose plugins that can help you with security, caching, SEO, and overall performance. Some useful plugins that you can try are:
#7. Set Up Google Analytics
Install Google Analytics 4 for a better understanding of your visitors’ behaviour. After the launch, set up Google Analytics configuration and Tag Manager to start tracking your traffic, bounce rates, content performance, and referral sources. You can also use the MonsterInsights plugin to set up your GA4.
By following these steps, you will develop a robust foundation for your new WordPress site, allowing it to adapt to new trends and run smoothly.
Final Words
Migrating to WordPress from Drupal is not just a process of switching from one CMS to another; it is a strategic move toward growth, ease, and maximum agility. It is a significant undertaking, but by planning and executing it carefully, you can transfer your Drupal content to WordPress successfully while taking advantage of the powerful features of WordPress. Follow the steps mentioned here for a successful migration and watch your website thrive on a robust platform.
FAQs
1. Is It Possible to Migrate Drupal Custom Functionalities to WordPress?
Yes, but for this, you may need to go for custom development work. Start by listing your essential features and functionalities, and identify WordPress plugins that offer similar capabilities. If no equivalent plugins exist, partnering with an experienced WordPress development company can help you replicate complex Drupal modules through custom plugin development.
2. How Long Does the Migration Process Generally Take?
Based on the complexity and size of your Drupal website, the duration can range from a few weeks to months.
3. Will My Current SEO Rankings Be Affected By the Drupal to WordPress Migration?
The process may affect your SEO rankings, but you can lower the chances by implementing a proper SEO setup and 301 redirects.
4. Should I Hire a Professional Developer to Migrate My Drupal Site to WordPress?
Even though you can complete the migration on your own, hiring an expert can greatly expedite the entire process and help avoid potential issues.
5. Is the FG Drupal to WordPress Plugin Free to Use?
Yes, the basic version is free to use. However, to use advanced features, such as custom field mapping, media migration, etc., you will have to buy the premium version.

Prince Jadiya holds the position of Chief Marketing Officer at Psdtohtmlninja.com, where he assists organizations in overcoming web development obstacles. He is also known for him informative and engaging blog posts.
Couldn't find what you were looking for?
Let us know how we can help!

Related Blog Posts