Table of Content
In the ever-evolving world of web design, Webflow has emerged as a powerful tool. Its excellent CMS capabilities, clean code output, and visual designer provide you with a reliable platform to create a professional, stunning website . However, this platform has some limitations. As this platform controls all the elements of your website, it can restrict you from optimizing your content or integrating new features. On the other hand, the recurring subscription fees can become a barrier to ownership.
This is where WordPress comes into play. Powering more than 43 percent of websites, WordPress is a leader in content management systems. This open-source and self-hosted CMS provides users with a huge ecosystem of plugins, themes, and unparalleled freedom.
Migrating from Webflow to WordPress can be a life-changing decision, but the process can feel overwhelming. This detailed guide is designed to help you on this journey. We have covered all the crucial steps, from preparation to post-migration optimization, so that you can complete the transition confidently and smoothly.
Let’s get started with the top reasons to switch from Webflow to WordPress.
Top Reasons to Switch From Webflow to WordPress
Before exploring the technical steps, let’s understand why migrating to WordPress from Webflow would be a wise decision for your business.
#1. Open-source Flexibility
Webflow is good and clean. However, with WordPress, you can convert your imagination into reality effortlessly. It offers you unlimited themes, plugins, and custom coding. You can customize every aspect to make your site look stunning. Whether you want an e-commerce platform, a portfolio, or a simple blog site, WordPress has everything you need.
#2. Cost Efficiency
WordPress is completely free. Also, it allows you to choose a hosting plan based on your budget and needs. If you are creating a basic blog site, a free theme would be enough. Furthermore, there are plenty of free plugins that you can use to add more functions to your site.
#3. Plugin Ecosystem
WordPress offers more than 60,000 plugins. From SEO, backup, and security to e-commerce, marketing, and monetization, there are plugins to support all your requirements.
#4. SEO Control
With WordPress, you will get control over your site’s schema markup, permalinks, and metadata. WordPress uses standards-compliant and clean code, allowing search engines to understand and crawl your site easily. This can lead to effective indexing. Furthermore, you can use image optimization, caching, and CDN plugins to load your site faster.
#5. Better Ownership and Long-Term Control
When you opt for WordPress, you can choose a hosting provider of your choice and control your domain. Besides, you can back up, export, and move things as per your needs. With Webflow, you will not enjoy such a level of control. Working with dynamic content or CMC collections in Webflow is very challenging.
#6. Perfect for Content-Heavy Sites
If you are managing a lot of blog posts or blogging frequently, you may not find a better option than WordPress. This CSM is designed to efficiently handle authors, tags, categories, etc. Besides, you can transfer blog posts from Webflow to WordPress using a plugin or by uploading a CSV file.

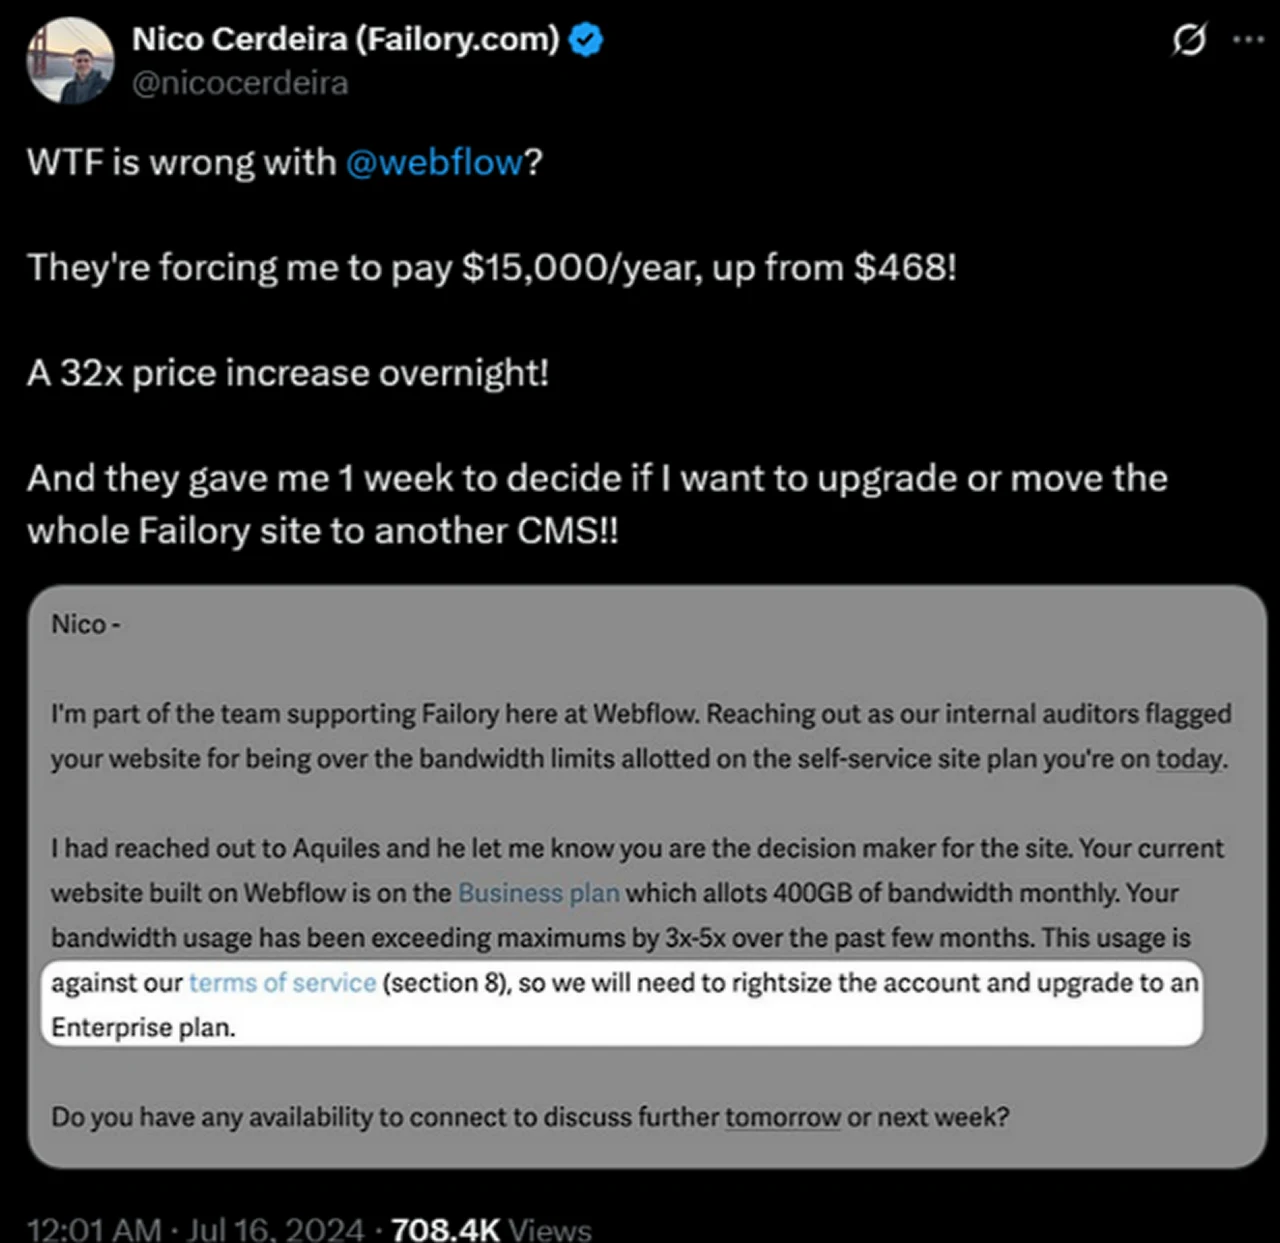
Recent Webflow Pricing Updates and Social Reactions
Now, let us move on to the pre-migration steps you need to consider before migrating from Webflow to WordPress.
Important Steps to Prepare Before Migrating From Webflow to WordPress
A successful migration depends on your preparation. Skipping this phase can lead to data loss, SEO issues, and broken links. Before you move your Webflow content, ensure that you have completed the following pre-migration steps.
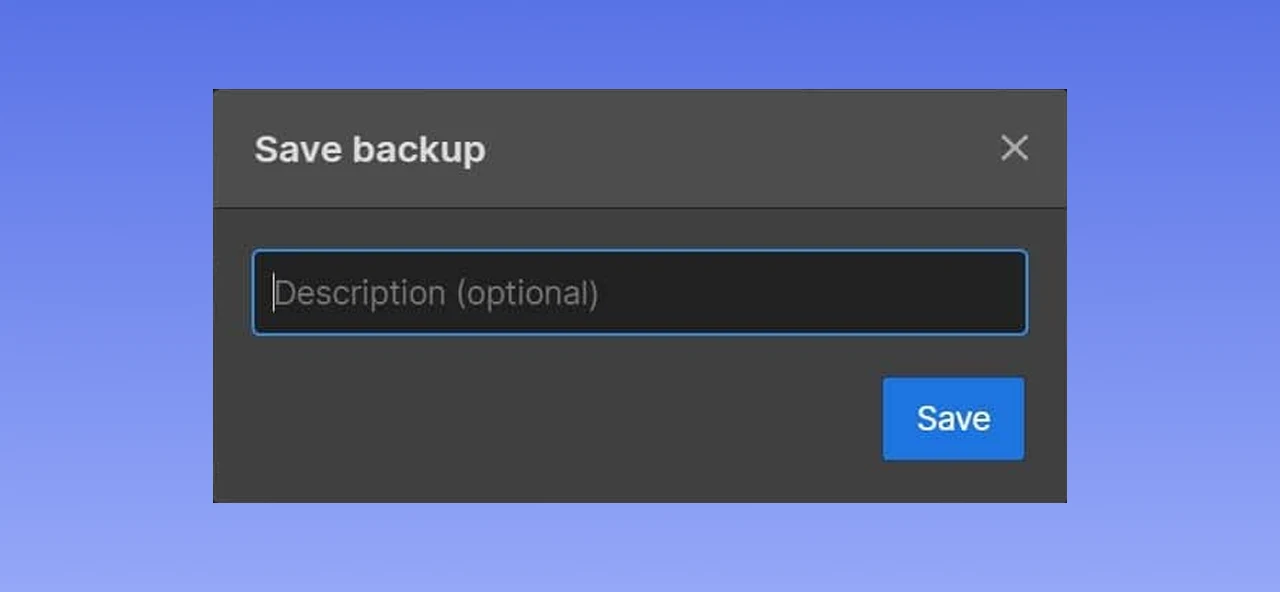
1. Take A Backup of Your Webflow Website
Even though Weblfow will not delete your website while migrating, it is still advisable to create a backup. For this, press Ctrl+Shift+S. This will create your site’s restore point. If you are using a Mac system, press Cmd+Shift+S. Then, add a Description and click on the Save button.
2. Check Your SEO Setup
Before you start exporting content, carry out a detailed SEO audit of your site. You can also use tools like Ahrefs Site Audit or Screaming Frog to crawl the whole website and get a detailed report. Export the complete sitemap and take a note of your meta descriptions and URL structure. Besides, detect all your high-performing pages and try to preserve those pages’ structure.
3. Opt For A Right WordPress Hosting Plan
The scalability, security, and performance of your new website significantly depend on the hosting service you have selected. For better results, opt for managed WordPress hosting. These service providers handle regular backups, security, performance optimization, 24/7 support, caching, etc. While choosing one, ensure that the hosting plan includes SSL certificates and offers one-click WordPress installation. Hostinger, HostGator, DreamHost, Cloudways, and GoDaddy.
Now, let’s start with the detailed Webflow to WordPress migration process
How to Migrate From Webflow to WordPress
It’s time to start the migration process. We have broken this down into a 7-step process for your convenience.
Step 1. Exporting Content From Webflow
To explore the required content from Webflow, follow these steps:
First, log in to your Webflow account. Then, choose the project you want to transfer to WordPress.
Click on the CMS Collection option that you will find on the left sidebar. Now, select the collection you want to export.
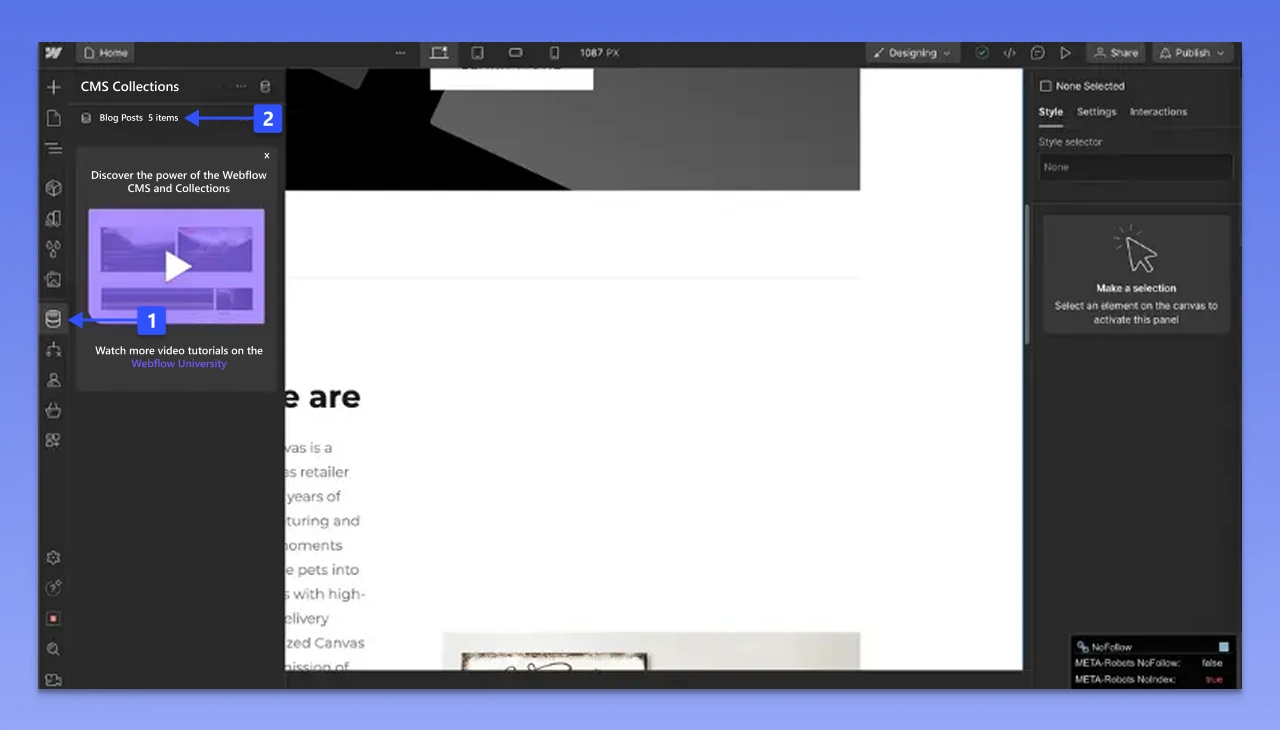
Click on the Export option to download the content in a CSV file. To migrate every collection, you will have to repeat this process and save every CSV file.

Webflow lets you export static pages, blog posts, embedded blocks, and gallery content.
Note: Product pages, dynamic styling, and custom CSS will not transfer automatically. You will have to recreate these manually.
Need help with it? choose PSDtoHTMLNinja’s WordPress migration services.
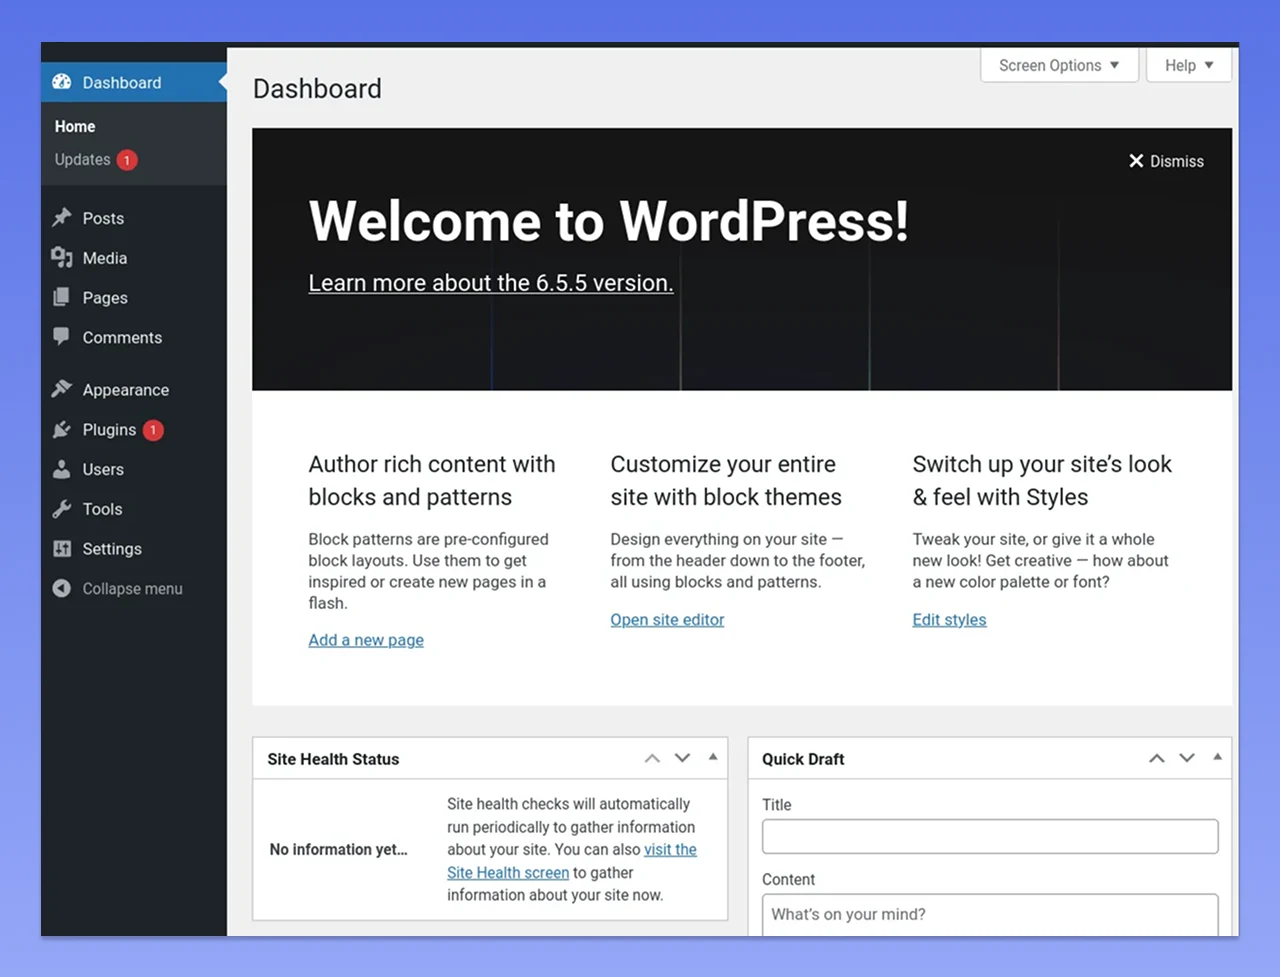
Step 2. Setting Up WordPress
Once you are done exploring Webflow’s content, it’s time to get started with WordPress installation. Most of the reputed hosting service providers provide their clients with a one-click WordPress installation facility. You just need to log in to the control panel and click on the Install WordPress. This method is hassle-free and doesn’t need any technical configurations.
Once installed, you need to complete some initial configuration.
First of all, set your website’s Title, Timezone, and Tagline. For this, visit Settings and then click on the General tab.

Then, go to Settings and click on the Reading option. Now, click on the “Discourage Search Engines From Indexing This Site” option.

This will prevent Google from indexing your site while migrating. Uncheck this option after the completion of migration.
Read this: Steps to Convert HTML to WordPress Theme
Step 3. Importing Content Into WordPress (Manual Method and Tool-based Method)
This is the most crucial part of the Webflow to WordPress migration process. To important content, you can follow two different approaches.
Manual Method
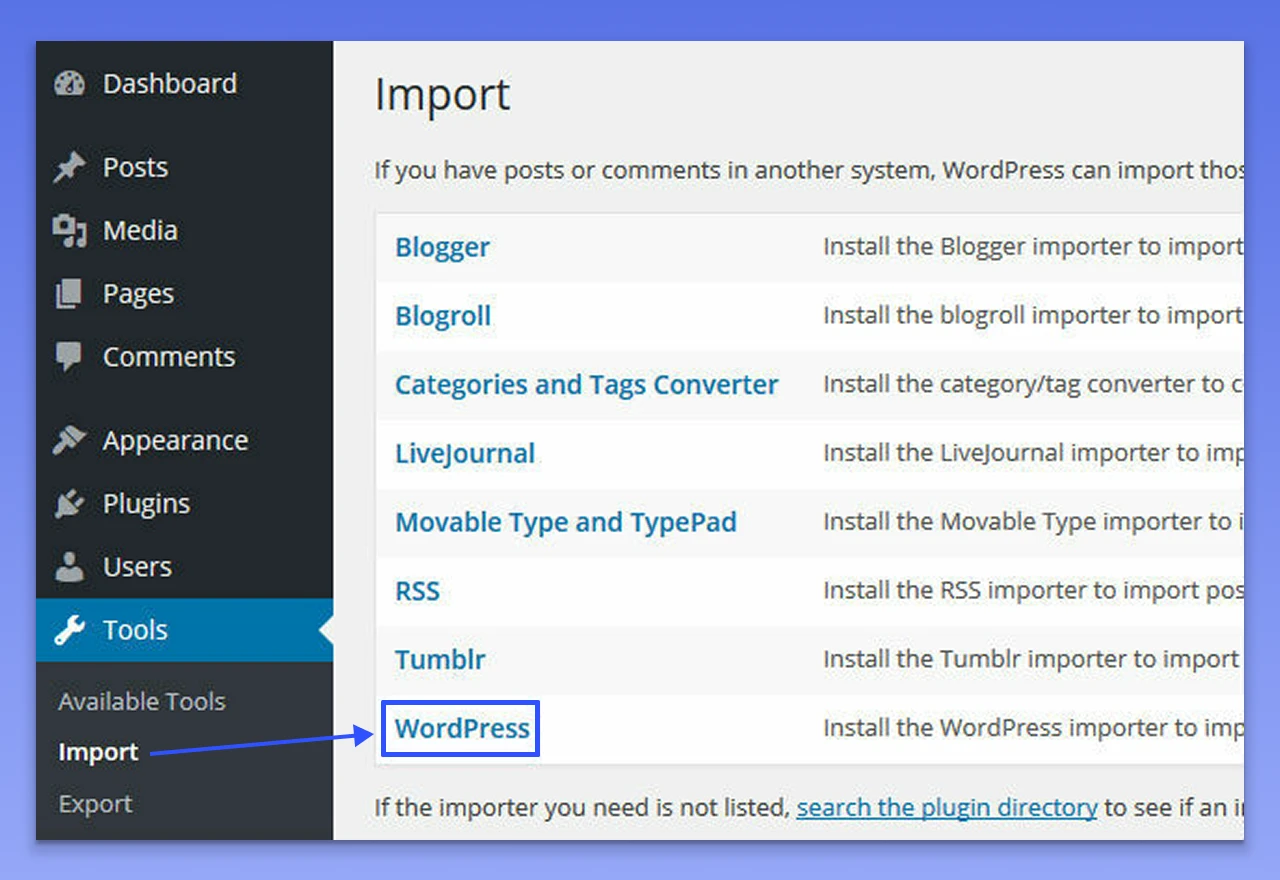
- First of all, you need to visit the WordPress dashboard and then click on the Tools option. Now choose the Import option.
- You will get a list of services to choose from, such as RSS, LiveJournal, WordPress, etc.
- Select WordPress and then click on the Install Now option.
A new page will open with an option to choose a file to upload. Click on the Choose File option.
Upload the XML file and click on the Continue button to complete the process.
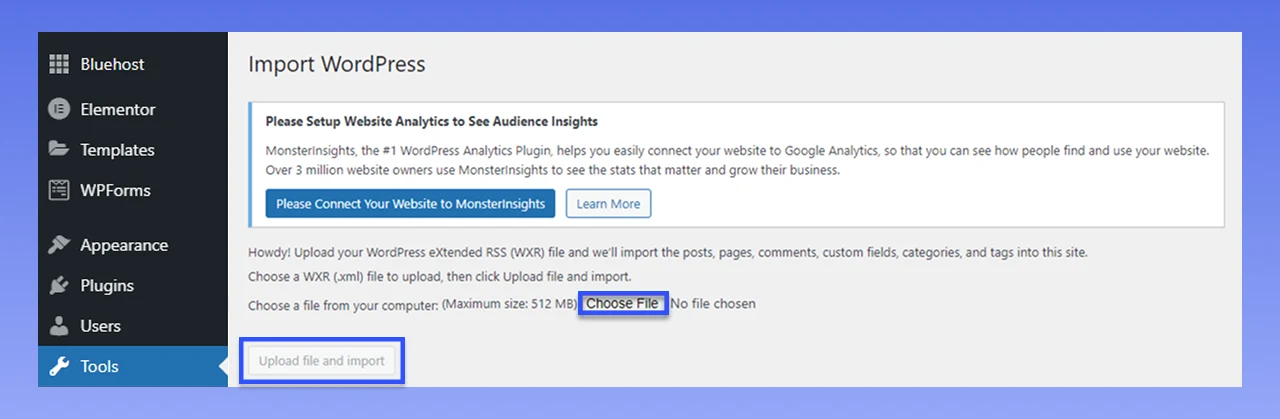
Keep in mind that this method can only be used when you have XML files.
Tool-Based Method
Want to save your time and simplify the process of exporting content? You can use a tool called WP All Import. Follow these steps carefully:
Go to Plugins and click on the Add New Plugin option.
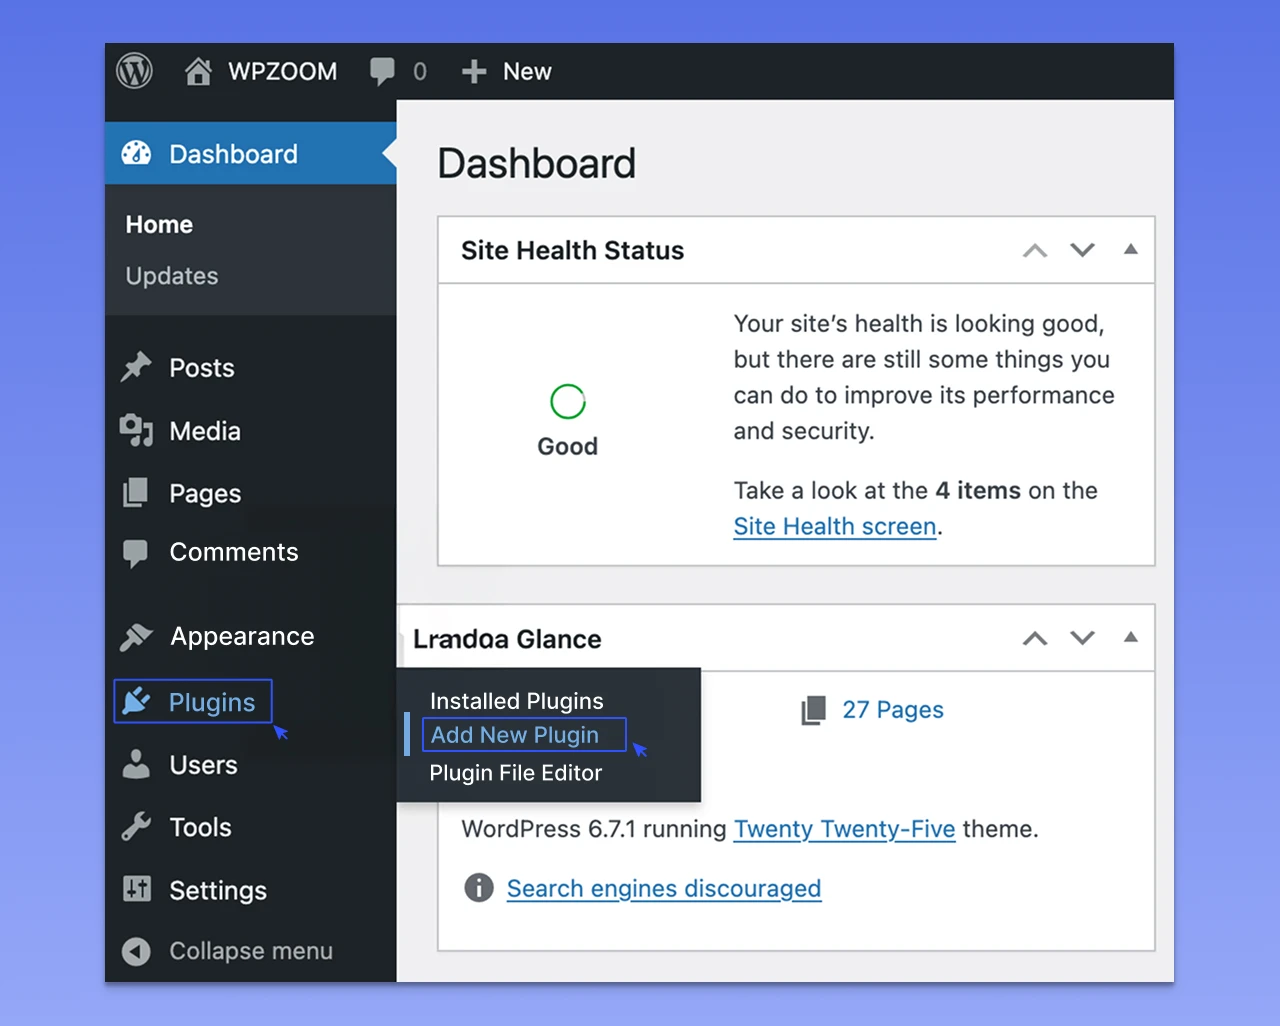
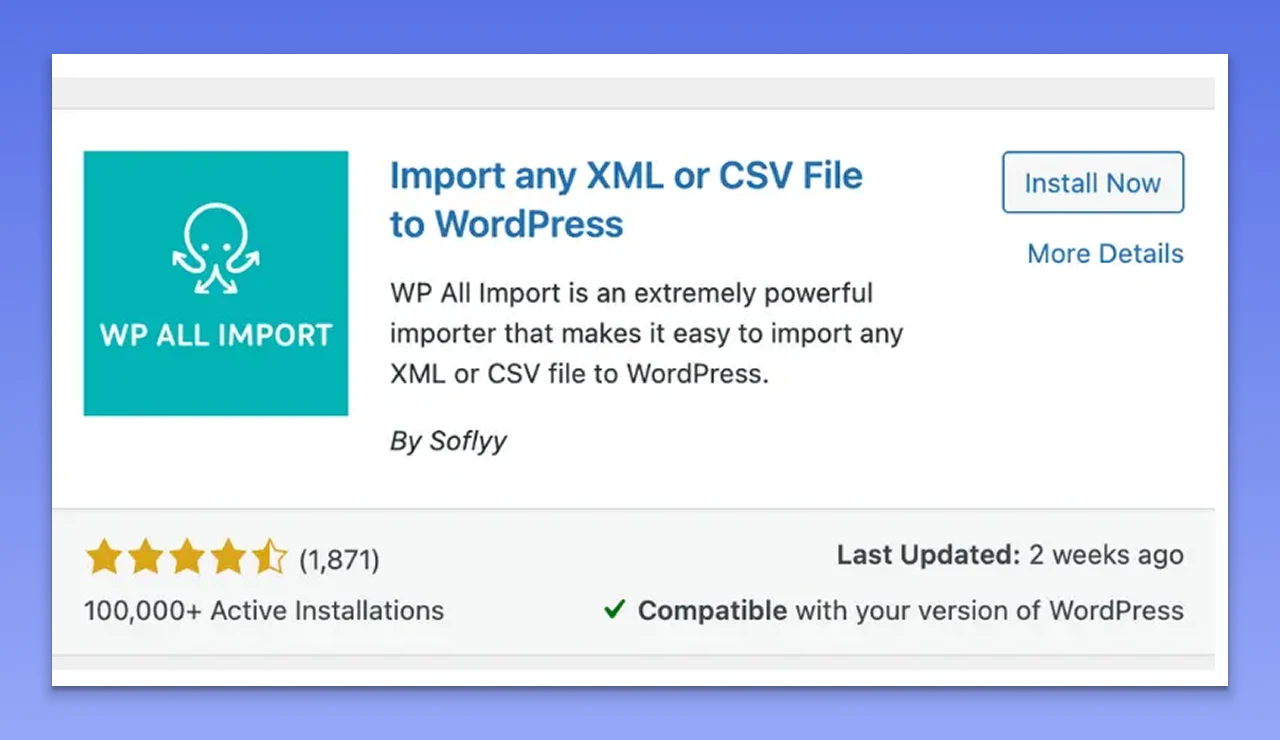
Use the search bar to find the WP ALL Import plugin. After that, click on the Install button to install and activate the plugin.
Now, go to the WordPress dashboard and click on the All Import plugin, and then choose New Import.
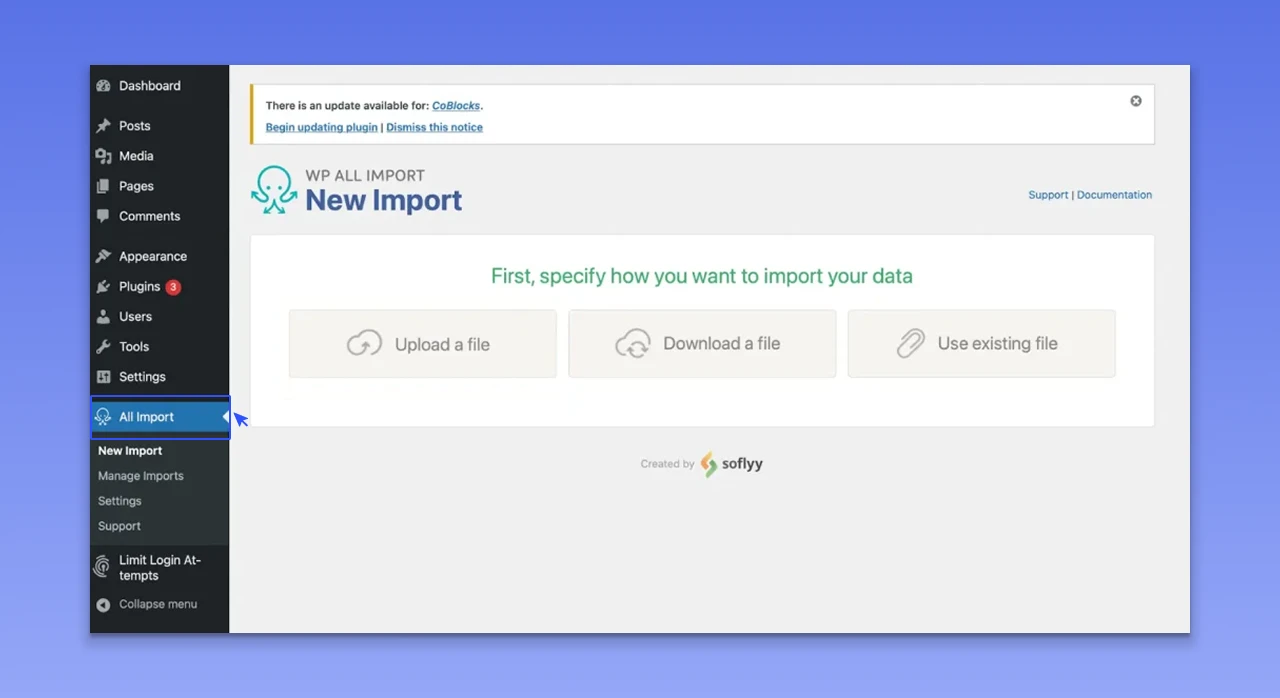
Click on the Upload a File option and choose the exported CSV file.
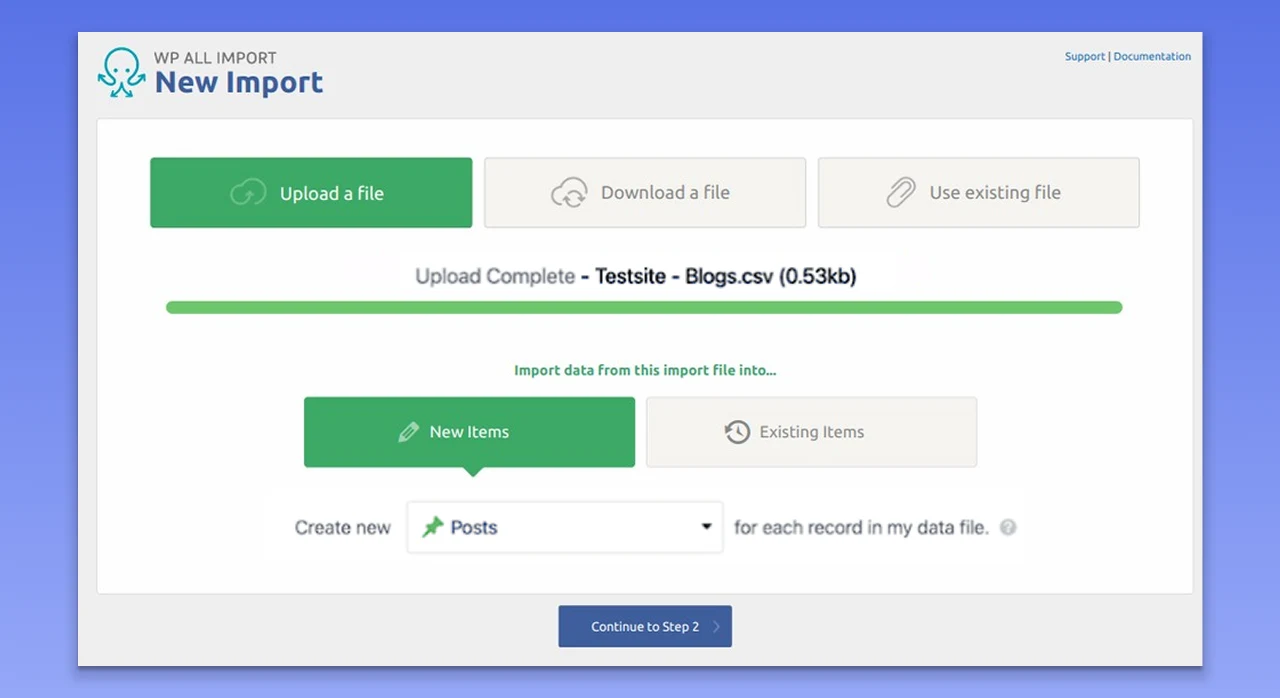
The plugin will offer you a drag-and-drop interface where you can customize fields and drag elements into the right fields.
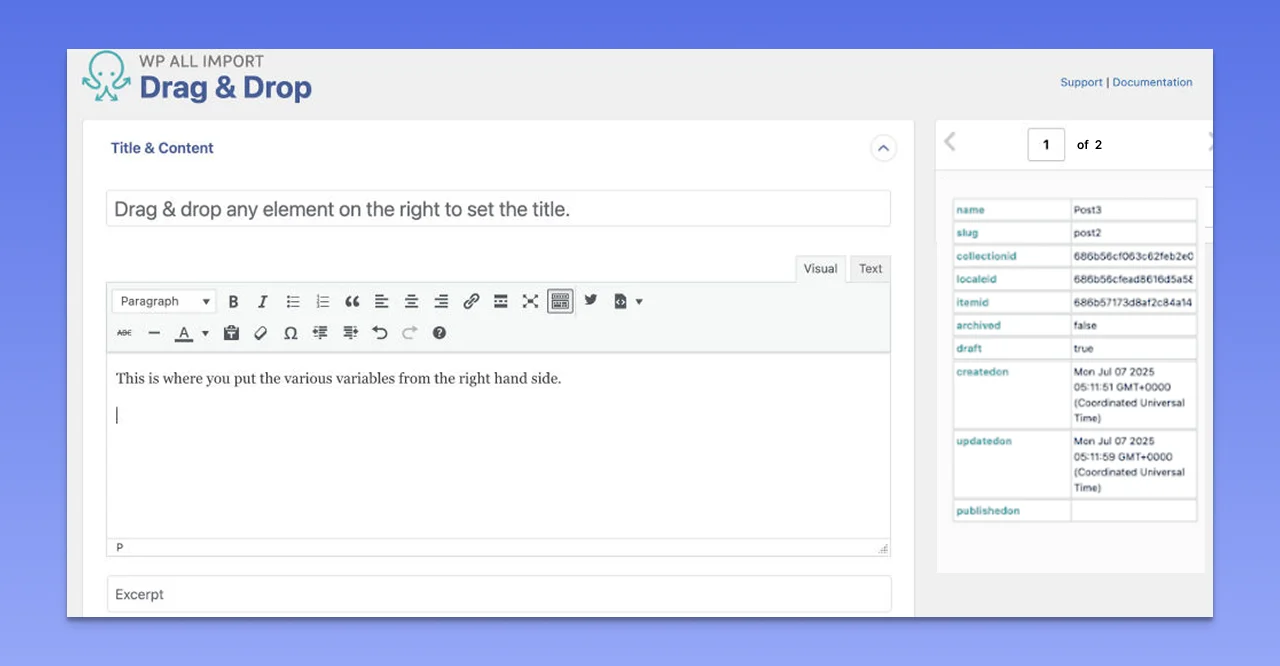
After mapping the required fields, you can move to the next step. Click on the Auto Detect button, and the plugin will generate unique IDs for every post.
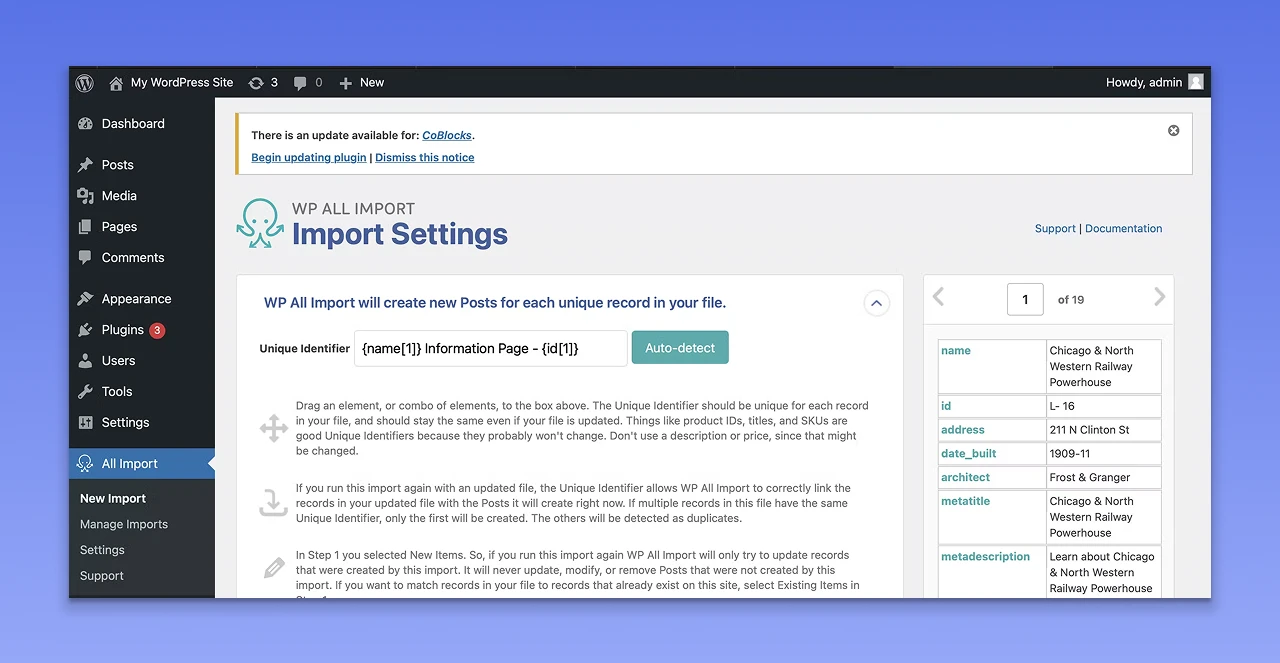
Carefully review the image placements and data mapping. After that, click on Continue and then tap on the Confirm & Run Import button to begin the process.
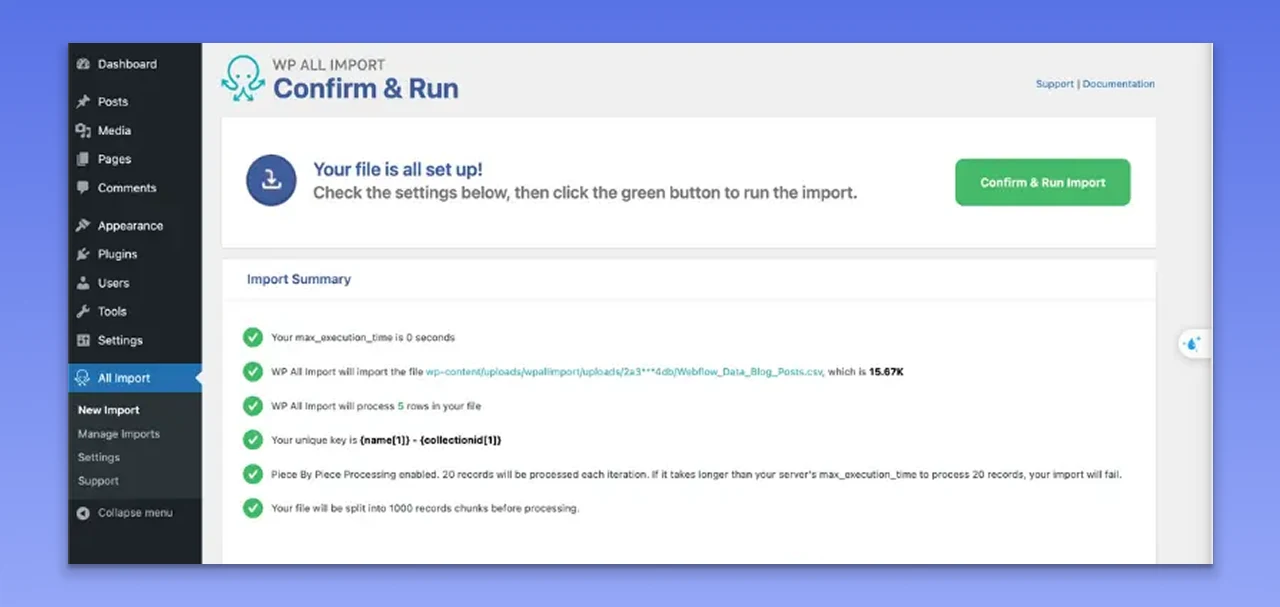
The importing process can take around 3 to 5 minutes, based on the total number of posts you want to import. For example, for 20 records, it will take around one minute. After that, you can do further refinement and customization.
Step 4. Installing a Theme in WordPress - Rebuilding the Webflow look
As you can’t export Webflow’s themes and designs to your WordPress website, you need to recreate the design manually. Use the downloaded assets from Webflow as your visual guide. And choose a theme that is responsive, highly customizable, and supports visual page builders. Follow these steps to install a theme:
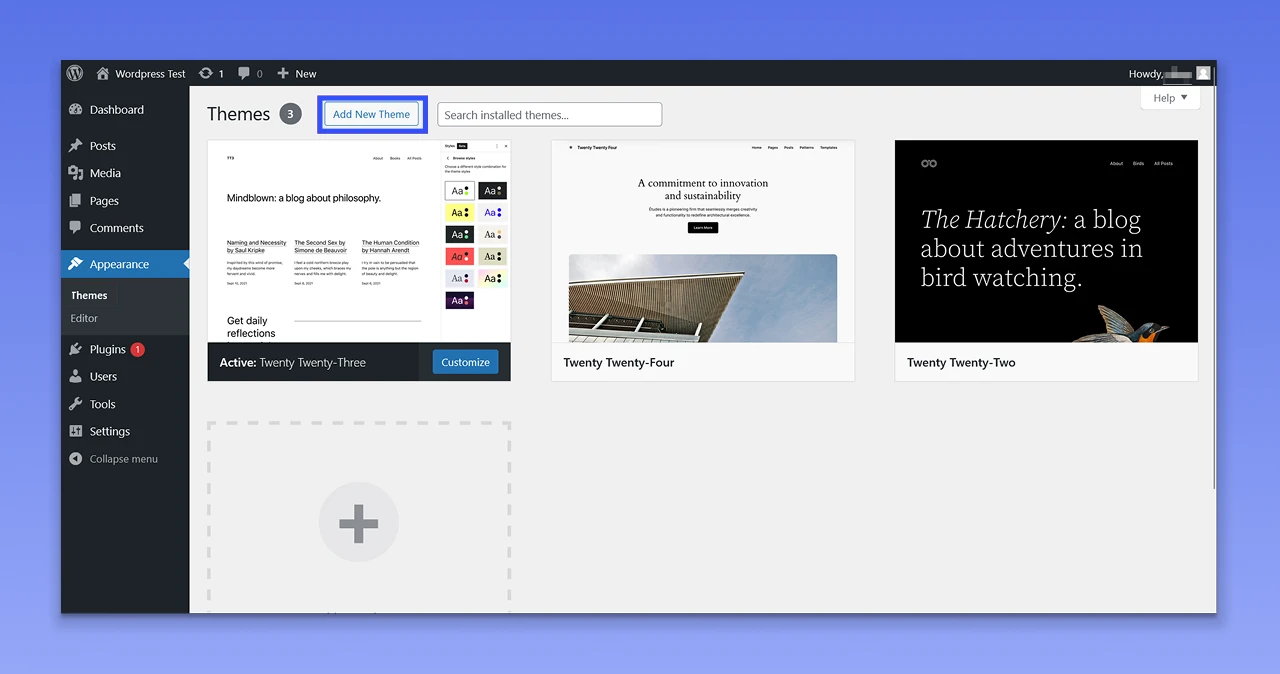
Log in to the WordPress admin board and click on the Appearance option. Now, click on the Theme option.
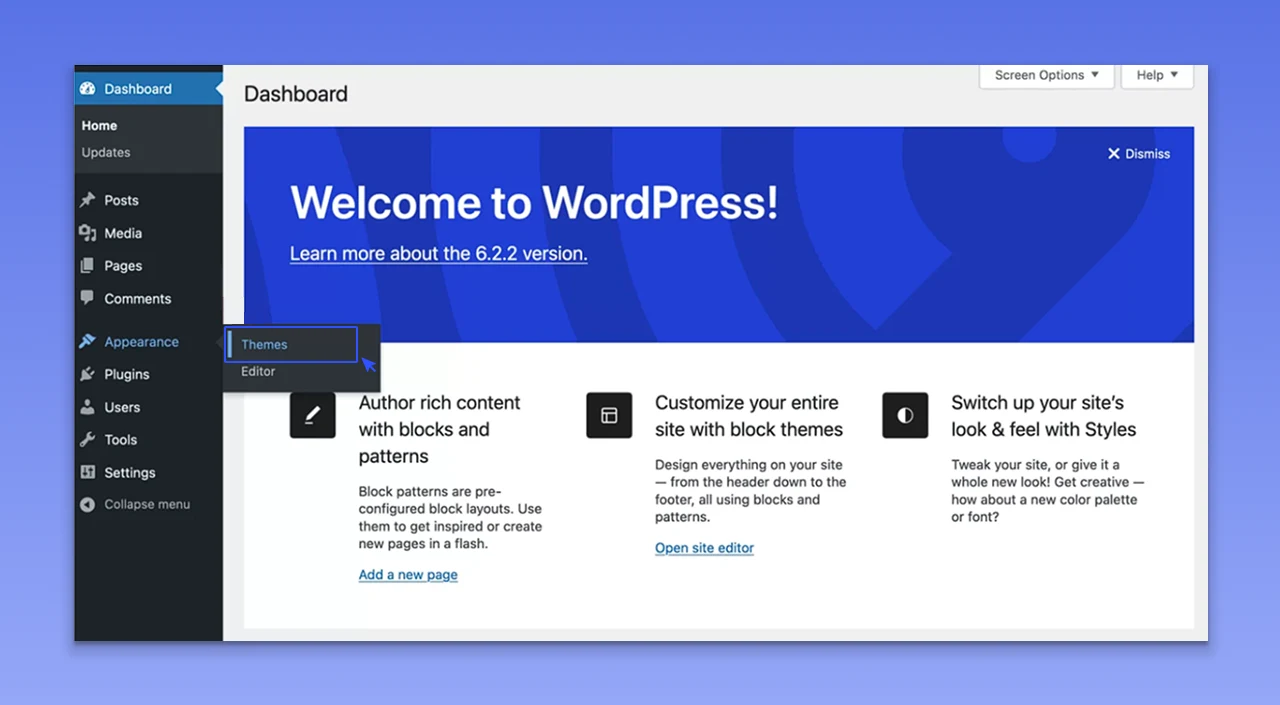
Tap on the Add New button and choose a theme based on your site’s nature and requirements.
Now, click on the Install button to install the theme.
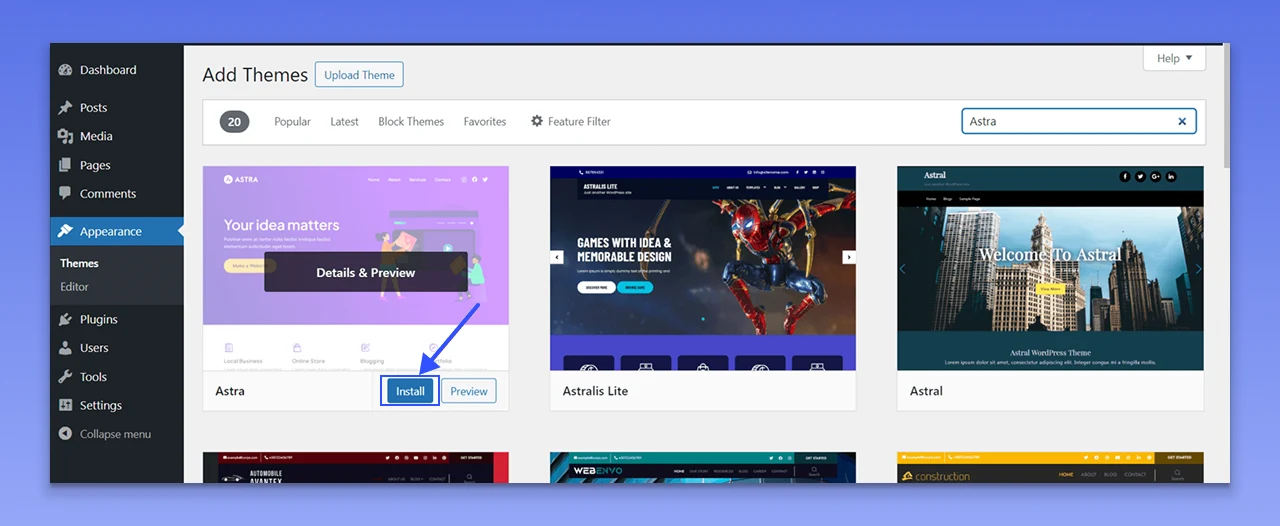
Activate the theme by clicking on the Activate option.
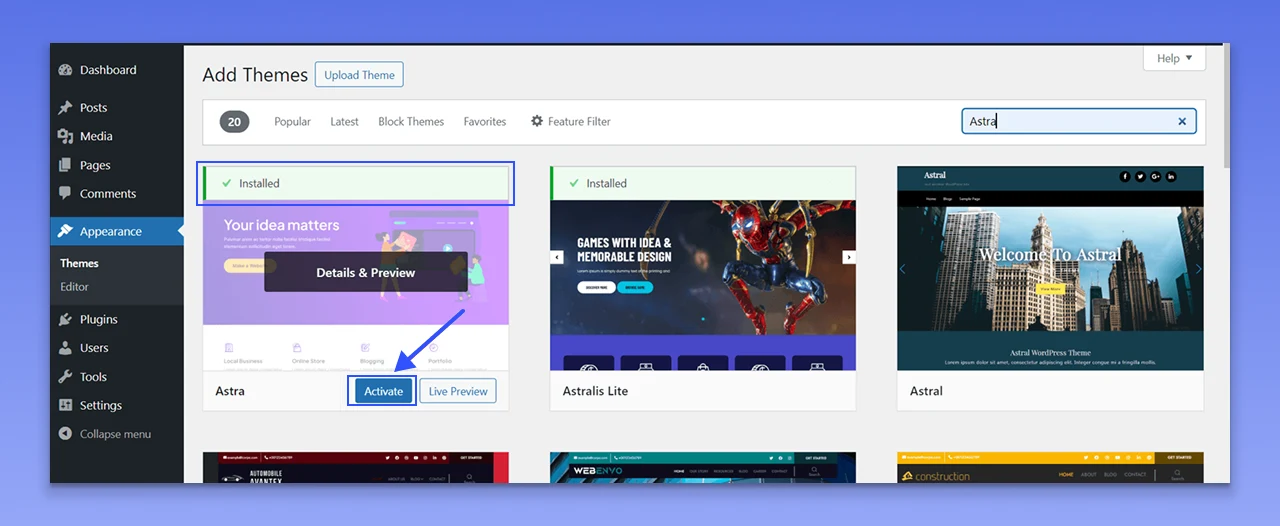
Now, you can go on and customize the theme using a page builder. This may take time, but the flexibility you enjoy is worth every hour you spent designing it.
Step 5. Setting Up Permalinks
Configuring permalinks is important to preserve your SEO score. For this, visit Settings and then click on the Permalinks option. You will find 6 different options to choose from. Select one that matches the URL structure of Webflow.
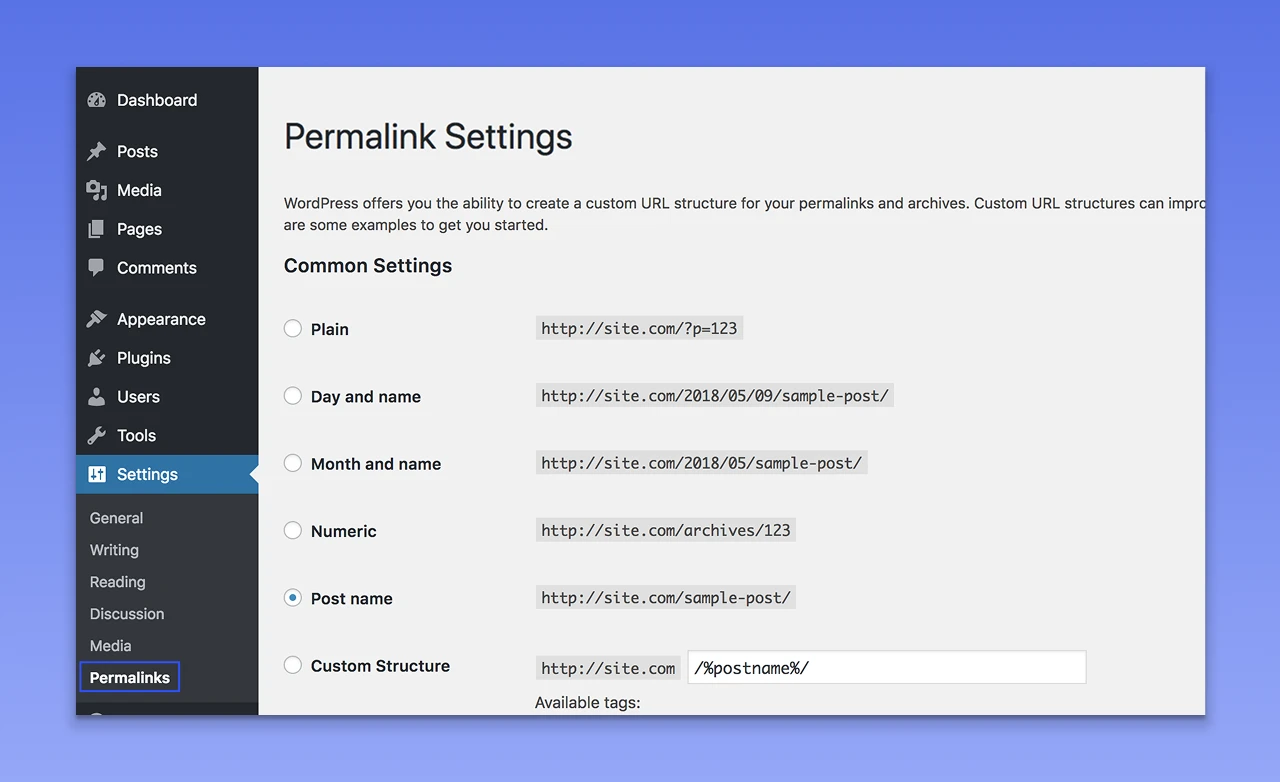
For instance, if the old Webflow blogs used blog/post-name, then you should choose the Post Name option. For a different structure, you can opt for the Custom Structure option. Just ensure that the new URL structure matches your old site.
Step 6. Updating DNS Settings
Even though you have migrated your Webflow site to WordPress, the domain may still point toward the old Webflow site. You need to update the DNS settings to redirect your visitors to the new site. In general, your WordPress host will offer you nameservers. You need to replace the nameservers of Webflow with the new ones by logging into the domain registrar platform. It can take around 24 to 48 hours to take effect.
Step 7. Launch and Monitor
Once everything checks out, it’s time to launch your new WordPress site. First of all, you need to turn off the Discourage Search Engines From Indexing This Site option. Then submit the new XML sitemap to Google Search Console.
Monitor your site’s traffic flow, user interaction, and performance using tools such as Hotjar or Google Analytics. Use the insights to optimize content, understand engagement patterns, and identify post-launch issues.
Even after following the exact steps, you might come across some common migration issues. Let’s confront and understand the ways to tackle them.
Know: How to Migrate Your Joomla Website to WordPress
Troubleshooting Common Migration Issues
Even though you have a perfect strategy to migrate from Webflow to WordPress, you might face some hurdles. Here we have listed some common issues and how to handle them. Have a look.
1️⃣ Plugin Conflicts
Sometimes, your website may not function properly after installing plugins. Some pages won’t load, and features may become unavailable. Faulty plugins can be a major reason behind this. To fix it, disable all your plugins and reactivate one by one. This will help you identify which plugin is causing the issue. Before installing plugins, ensure that they are compatible with the WordPress version you are using. To simplify this, you can install the Health Check & Troubleshooting plugin.
2️⃣ Missing Images and Content
If your images are not discoverable on WordPress, then they are not properly migrated from Webflow’s servers. Once the migration is done, WordPress won’t be able to access the URLs of old images. You will get broken image icons.
To solve this, prefer to upload your images manually to your media library and then update the URLs. You can also use the Auto Upload Images plugin to fix this issue.
3️⃣ Design Inconsistencies
It is common to face inconsistencies in design after a migration. WordPress themes and page builders render CSS differently. Custom styling of Webflow may not translate accurately. You may need to rebuild some sections. Ensure that your layouts, user experience, and branding are consistent. Take advantage of theme customization tools and custom CSS.
4️⃣ Performance Drop
If your new WordPress website is not optimized properly, it will function more slowly than Webflow. After the migration, install a caching plugin. Compressing your images using plugins like ShortPixel or Smush can make them load faster. What’s more? Enabling gzip compression can also help boost performance by lowering the size of data transfer between the browser and server.
5️⃣ Loss of CMS Structure
It generally happens when you import content from Webflow without configuring the corresponding post fields and types in your WordPress website. You may end up with standard pages or posts. In order to fix this issue, you can delete old content, configure Custom Post Types correctly, and then re-import. The Custom Post Type UI plugin can also be used for this.
Now, let’s move on to some post-migration tips that you need to keep your new website upgraded.
Post-Migration Optimization Tips
The task is not over once you launch the new site. There are some tasks you need to do to optimize and fortify your site.
✔️ Optimize Your Site Speed
The speed of your website can significantly influence user experience as well as SEO. Apart from caching, you should prefer to use a CDN, or Content Delivery Network, to boost load time. Some popular CDN plugins you can try are Cloudflare, Sucuri, RocketCDN, and Speed Booster Pack.
✔️ Install Required SEO Plugins
Using SEO plugins will make it easier for you to optimize the SEO elements of your website. Some powerful SEO plugins you can opt for are Rank Math, Yoast SEO, AIO, or All-In-One SEO, SmartCrawl, and Squirrly SEO. From automatically submitting an XML sitemap, carrying out site audits, to detecting issues and keyword searching, these tools can handle multiple tasks.
✔️ Configure Backups and Security
If your hosting provider doesn’t offer any security features, you can install plugins to manage security and backups. You can go for plugins like UpdraftPlus, Jetpack, and ManageWP.
✔️ Regular Updates
Once you are done creating a website, it is your responsibility to keep the WordPress core, plugins, and themes updated. This way, you can ensure smooth performance of your site while eliminating bugs.
✔️ Mobile Responsive Problem
Properly check your new WordPress website on different mobile devices. You can also use mobile-friendly test tools. Utilize the theme’s customizer and responsive editing mode to resolve layout issues. Keep an eye on elements and font size while customizing your theme. Always use a responsive theme.
Do You Need Expert Help for Your Migration?
Migrating from Webflow to WordPress is a multi-step and complex process. It requires patience, attention to detail, proper planning, and technical knowledge. If you have a small website, then you might be able to get it done on your own. However, for a complex or business-critical site where data loss, a drop in SEO score, and downtime mean a huge loss, it is advisable to hire an expert like PSDtoHTMLNinja.
Our experts have the required experience and tools to predict potential issues, create an effective strategy, ensure data integrity, and handle the process seamlessly. There would be minimal disruption. Some major benefits of hiring an expert from PSDtoHTML Ninja are:
- No data loss
- Smooth management of technical stuff
- Helps avoid costly errors
- Enhanced performance after the migration
- Ongoing support
- Helps with SEO optimization
Partnering with our professional Webflow to WordPress migration expert will offer you hands-on support and an extra layer of accountability.
Know more: How to Hire a Dedicated WordPress Developer
Closing Thoughts
Transitioning from Webflow to WordPress is more than just a technical shift; it’s a pivotal decision that can significantly impact your business's success. Whether you're migrating for long-term cost savings, increased customization, or better control over your website, WordPress offers unmatched freedom and scalability. By utilizing a scalable theme, the right migration tools, and a robust hosting platform, you can create a website that can easily grow and adapt over time.
This detailed and accessible guide will help you avoid common pitfalls and ensure long-term success. To simplify and expedite the process, consider partnering with PSDtoHTMLNinja, an experienced WordPress development expert.
FAQs
1. Is It Possible to Transfer an Entire Webflow Design to WordPress?
No, you can’t import the exact styling and structure of your Webflow site to WordPress. However, you can rebuild the design using a page builder or a customizable WordPress theme.
2. Does the Migration Process Impact a Website's SEO?
You may see a change in your SEO score after the migration if you are not careful. Prefer to preserve the URL structure, content hierarchy, set up 301 redirects, metadata, and update permalinks to avoid any SEO-related issues.
3. Is It Necessary to Use Plugins on a WordPress Site?
No, you just need to install the necessary plugins based on your requirements. For example, plugins for SEO, forms, security, speed optimization, and backup. Using plugins, you can customize your site without writing any code.
4. Is WordPress Challenging to Manage Compared to WordPress?
WordPress has a learning curve. However, it offers more flexibility, and you can easily understand its functions.
5. Is WordPress Superior to Webflow?
It completely depends on your requirements. Webflow offers an amazing visual interface to designers, and WordPress is well-known for its flexibility as well as a massive plugin ecosystem. Besides, to create a new site, WordPress is a cost-effective platform.
6. How Long Does the Migration Process Take?
The completion time will depend on the size and complexity of your website. Migrating a simple website may take around 5 days. In the case of large websites, it can take up to 2 weeks. You can take the help of a WordPress agency to speed up the migration.
7. Is It Necessary to Create a Staging Site for the Migration?
Yes, a staging site is crucial. It allows you to test your site before making it live. This way, you can lower the risk of breaking a live website during migration.

Prince Jadiya holds the position of Chief Marketing Officer at Psdtohtmlninja.com, where he assists organizations in overcoming web development obstacles. He is also known for him informative and engaging blog posts.
Couldn't find what you were looking for?
Let us know how we can help!

Related Blog Posts